Terminal for Beginners: No-Jargon Guide (Mac & Windows)
Never used a terminal? This guide explains what the command line is, how to open it on Mac and Windows, and the 10 essential commands every beginner needs.

If you've ever seen a tutorial that says "open your terminal and type..." and immediately felt lost, this guide is for you.
The terminal is one of those tools that looks intimidating but is actually incredibly simple once you understand the basics. By the end of this article, you'll know exactly what a terminal is, how to open it on your computer, and the 10 commands you'll use 90% of the time.
No computer science degree required. No prior experience necessary.
What Is a Terminal?
A terminal (also called the "command line," "shell," or "console") is a text-based way to interact with your computer. Instead of clicking icons and dragging files with a mouse, you type short text commands.
Think of it like this: Your computer's normal interface (the Desktop, Finder, File Explorer) is like ordering food from a menu with pictures. The terminal is like telling the chef exactly what you want, ingredient by ingredient. Both get you food — the terminal is just more precise and much faster for certain tasks.
Why Should Beginners Care?
You might be wondering: "I have a perfectly good mouse. Why would I ever use this?"
Here's why:
- AI tools require it. Installing tools like Ollama, Node.js, Python, and most AI frameworks requires terminal commands.
- It's faster. Renaming 500 files takes 2 seconds in the terminal vs. 30 minutes of clicking.
- It makes you look like a wizard. Seriously. Your friends will think you're hacking the Matrix.
- Every tech tutorial assumes you know it. Once you learn these basics, you'll never be stuck again.
How to Open the Terminal
On a Mac (macOS)
There are two ways to open the terminal on a Mac:
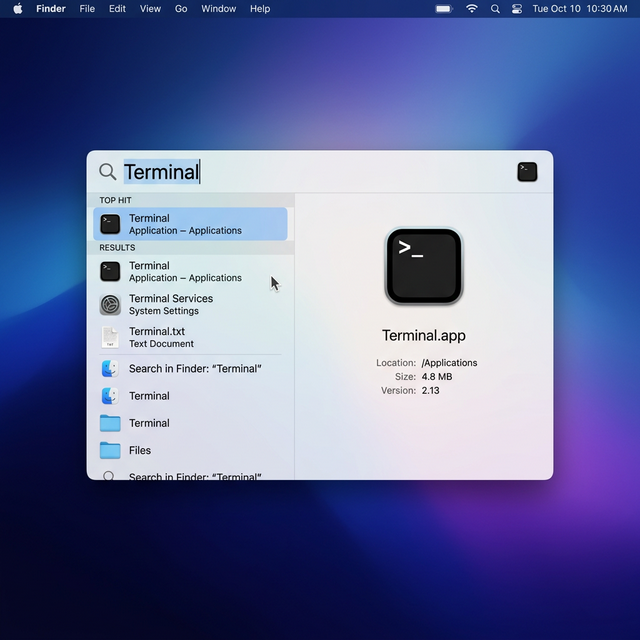
Method 1: Spotlight Search (Fastest)
- Press ⌘ Cmd + Space on your keyboard. A search bar appears in the center of your screen.
- Type Terminal.
- Press Enter. Done.
Method 2: Finder
- Open Finder (the smiley-face icon in your Dock).
- Click Applications in the left sidebar.
- Open the Utilities folder.
- Double-click Terminal.
Pro tip: After opening Terminal, right-click its icon in your Dock and select "Options → Keep in Dock" so you can always find it with one click.
Once open, you'll see a window that looks something like this:
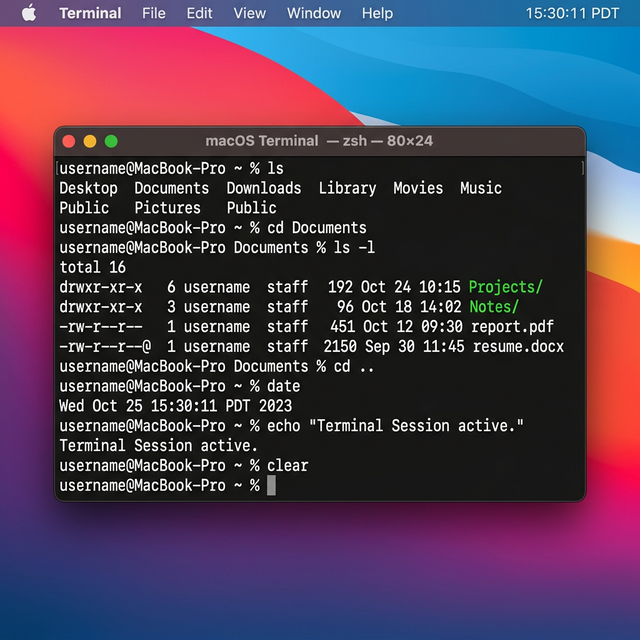
That blinking cursor after the % sign is where you type your commands. Don't be intimidated — it's just waiting for instructions.
On Windows
Windows gives you several terminal options. Here's the simplest:
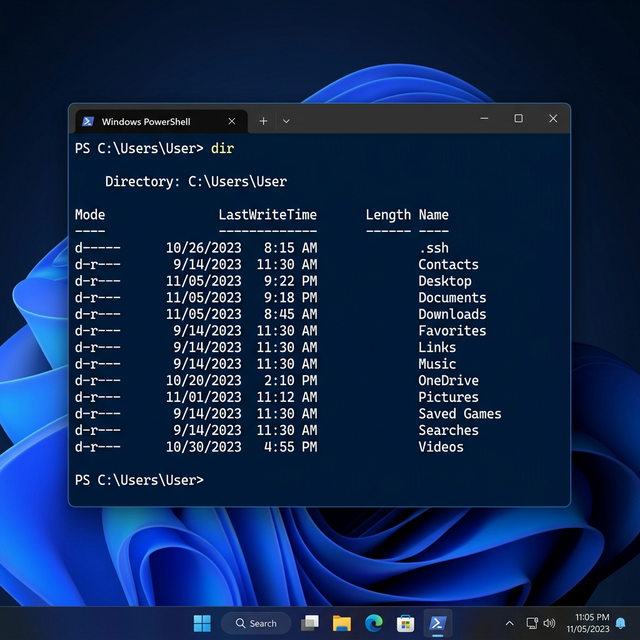
Method 1: PowerShell (Recommended)
- Press the Windows Key on your keyboard.
- Type PowerShell.
- Click "Windows PowerShell" from the results.
Method 2: Command Prompt (Classic)
- Press Windows Key + R (opens the "Run" dialog).
- Type cmd and press Enter.
Method 3: Windows Terminal (Best Experience)
- Open the Microsoft Store app.
- Search for "Windows Terminal" and install it (free).
- Open it from the Start Menu. It supports multiple tabs and looks much better than the classic options.
Which one should I use? If you're on Windows 11, install Windows Terminal from the Microsoft Store. It's the best experience. For Windows 10, PowerShell works perfectly fine.
Understanding the Prompt
When you open the terminal, you'll see something like this:
On Mac:
username@MacBook-Pro ~ %
On Windows:
PS C:\Users\Username>
This is called the prompt. It's telling you:
- Who you are (your username)
- Where you are (the current folder/directory)
- That it's ready for your next command (the
%or>symbol)
The ~ symbol on Mac means your home folder (which contains Desktop, Documents, Downloads, etc.).
On Windows, C:\Users\Username is the same thing — your home folder.
The 10 Essential Terminal Commands
These 10 commands will cover 90% of what you'll ever need as a beginner. Each one has a Mac and Windows version.
1. pwd — Where Am I?
Shows your current location in the folder structure.
Mac:
pwd
Output: /Users/yourname
Windows:
pwd
Output: C:\Users\yourname
Translation: "Show me which folder I'm currently inside."
2. ls / dir — What's in This Folder?
Lists all files and folders inside your current location.
Mac:
ls
Windows:
dir
You'll see a list like: Desktop Documents Downloads Pictures Music
Translation: "Show me everything in this folder."
3. cd — Move to a Different Folder
cd stands for "change directory." It moves you into a different folder.
Both Mac and Windows:
cd Desktop
Now you're inside the Desktop folder. Type pwd again to confirm.
To go back up one folder:
cd ..
To go back to your home folder:
cd ~
Translation:
cd Desktopmeans "walk into the Desktop folder."cd ..means "walk back out."
4. mkdir — Create a New Folder
mkdir stands for "make directory."
Both Mac and Windows:
mkdir my-project
This creates a new folder called my-project inside whatever folder you're currently in.
Translation: "Create a new folder called my-project right here."
5. touch / New-Item — Create a New File
Mac:
touch notes.txt
Windows:
New-Item notes.txt
This creates an empty file called notes.txt.
Translation: "Create a blank file with this name."
6. cat / type — Read a File's Contents
Mac:
cat notes.txt
Windows:
type notes.txt
Translation: "Show me what's written inside this file."
7. cp / copy — Copy a File
Mac:
cp notes.txt notes-backup.txt
Windows:
copy notes.txt notes-backup.txt
Translation: "Make a duplicate of this file with a new name."
8. mv / move — Move or Rename a File
Mac:
mv notes.txt Documents/notes.txt
Windows:
move notes.txt Documents\notes.txt
To rename a file (same command):
mv old-name.txt new-name.txt
Translation: "Pick up this file and put it somewhere else" or "rename it."
9. rm / del — Delete a File
Mac:
rm notes.txt
Windows:
del notes.txt
⚠️ Warning: There is no Recycle Bin in the terminal. Deleted files are gone forever. Be careful with this command.
To delete an entire folder and everything inside it (Mac):
rm -rf my-project
Translation: "Permanently erase this file. No undo."
10. clear — Clean Up the Screen
When your terminal gets cluttered with past commands, clean it up:
Both Mac and Windows:
clear
Translation: "Wipe the screen clean so I can think straight."
Quick Reference Cheat Sheet
| Action | Mac Command | Windows Command |
|---|---|---|
| Where am I? | pwd |
pwd |
| List files | ls |
dir |
| Move to folder | cd foldername |
cd foldername |
| Go back up | cd .. |
cd .. |
| Create folder | mkdir name |
mkdir name |
| Create file | touch file.txt |
New-Item file.txt |
| Read file | cat file.txt |
type file.txt |
| Copy file | cp src dest |
copy src dest |
| Move/rename | mv src dest |
move src dest |
| Delete file | rm file.txt |
del file.txt |
| Clear screen | clear |
clear or cls |
Installing Software via Terminal
One of the main reasons you'll use the terminal is to install developer tools. Here are the most common installations you'll encounter in AI and coding tutorials:
Installing Node.js (Required for Many AI Tools)
- Go to nodejs.org and download the installer, OR:
Mac (using Homebrew):
brew install node
Windows (using winget):
winget install OpenJS.NodeJS
Verify it's installed:
node --version
You should see something like v20.11.0.
Installing Python
- Go to python.org and download the installer, OR:
Mac:
brew install python
Windows:
winget install Python.Python.3.12
Verify:
python3 --version
Installing Ollama (For Running Local AI Models)
Go to ollama.com and download the installer. Once installed, verify:
ollama --version
Then pull your first AI model:
ollama pull mistral-small
For a deep dive into running AI models locally, check out our Openclaw AI User Guide.
Common Mistakes and How to Fix Them
"Command not found"
zsh: command not found: node
This means the program isn't installed, or your terminal doesn't know where to find it. Fix: Install the program, or restart your terminal after installing.
"Permission denied"
Permission denied
You're trying to do something that requires administrator access. Fix: Add sudo before the command (Mac) or run PowerShell as Administrator (Windows):
Mac:
sudo npm install -g openclaw-cli
It will ask for your password. Type it (nothing will appear on screen — that's normal) and press Enter.
"No such file or directory"
No such file or directory
You're trying to access a file or folder that doesn't exist in your current location. Fix: Use ls (Mac) or dir (Windows) to see what's actually in the current folder, then check your spelling.
What's Next?
Now that you're comfortable with the terminal, you're ready to tackle real AI projects:
- Openclaw AI User Guide — Build and run local AI agents using the terminal
- AI Side Hustles That Require No Code — Beginner-friendly ways to make money with AI
- Generative Engine Optimization Guide — Optimize your content for AI search engines
Remember: Every expert was once a beginner who felt silly typing
lsfor the first time. You're doing great. Keep going.
Get the Blueprint: Want to launch a profitable AI business from scratch? Grab The Ultimate AI Toolkit ($19) — a 200+ page framework featuring exact implementation steps for content automation, consulting, and AI agency building.

Alex the Engineer
•Founder & AI ArchitectSenior software engineer turned AI Agency owner. I build massive, scalable AI workflows and share the exact blueprints, financial models, and code I use to generate automated revenue in 2026.
Related Articles

How to Make Money on Fiverr with AI Tools in 2026: 7 Gigs You Can Start This Week
Discover 7 real Fiverr gigs you can launch using free and low-cost AI tools in 2026 — no experience required. Real pricing data, step-by-step setup, and tools that actually work.

How to Make Money with AI Tools in 2026: 7 Proven Methods for Beginners
New to AI and wondering how to turn it into income? Here are 7 proven methods beginners are using in 2026 — with the exact tools, realistic earnings, and how to start this week.
Krea 2 Review: The AI Image Generator Built From Scratch (2026)
Krea 2 launches today with Raw and Turbo models, open weights, and 2-second generation. This beginner guide covers what it is, how it compares to Midjourney and FLUX, and whether the free plan is worth it.